How to Bake the Perfect Turkey (Dry Brined with Compound Butter)
Try this recipe for “How to Bake the Perfect Turkey (Dry Brined with Compound Butter)” uses a Homemade Citrus Herb Dry Brine and Savory Poultry Seasoning Compound Butter, resulting in a juicy, flavorful, foolproof Thanksgiving turkey!
This post may contain affiliate links. Please read our disclosure policy.
Follow this recipe: “How to Bake the Perfect Turkey (Dry Brined with Compound Butter)” for the best-tasting roasted turkey.
Have you ever struggled with a bland turkey, uneven roasting, or wondered if the turkey is actually done?
This is the method of preparing and cooking the turkey will fix all of that! This is my complete step-by-step guide to roasting the perfect, deeply flavorful turkey: dry-brined, rubbed with an herby poultry-seasoning compound butter, stuffed with fresh aromatics, and roasted for maximum juiciness.
The best part? Everything is simple, repeatable, and works for any size bird with this method and recipe for “How to Bake the Perfect Turkey (Dry Brined with Compound Butter)”.
How to make How to Bake the Perfect Turkey (Dry Brined with Compound Butter):
Ingredients:
- 1 Turkey
- Homemade Citrus Herb Dry Brine for Turkey 1 tablespoon of dry brine per 5 pounds of turkey, plus 1 teaspoon divided use
- Savory Seasoning Compound Butter (1 stick of butter, 1 tablespoon poultry seasoning, 1 teaspoon salt, ½ teaspoon of ground pepper)
- Aromatics: onion, garlic, herbs (thyme and sage), apple or orange
- water or stock (to add to the bottom of the roasting pan)
Equipment:
Step 1: Plan Your Turkey Timeline (4-5 Days Total)
- A great turkey starts days before Thanksgiving with proper thawing and dry brining.
- A turkey takes 4–5 full days in the refrigerator to thaw, longer than most people think!
- Here’s the timeline I use:
- Day 1–3: Turkey sits in the fridge, still wrapped, thawing slowly.
- Day 3 or 4: Unwrap the turkey, remove the turkey neck and giblets, and begin dry brining.
- Day 4 or 5: Rub the turkey with Savory Poultry Seasoning Compound Butter, and roast the turkey.
Step 2: Dry Brine the Turkey (24–48 Hours) THIS IS DAY 3 or 4!
- You can dry brine for as little as 12 hours, but 24 to 48 hours gives the best results.
- Dry brining means salting and seasoning the turkey ahead of time so the salt and seasoning can penetrate deeply into the meat. This gives you:
- Juicier breast meat
- Better seasoning throughout
- Crispy skin
- Shorter cooking time
- Use my recipe for Homemade Citrus Herb Dry Brine for Turkey or another dry brine you like.
- My Dry Brine uses: Diamond Kosher Salt, Sugar, Black Pepper, Garlic Powder, Thyme, Rosemary, Oregano, Fennel, Sage, Red Pepper Flakes, Orange Zest, and Lemon zest.
How to Brine the Turkey
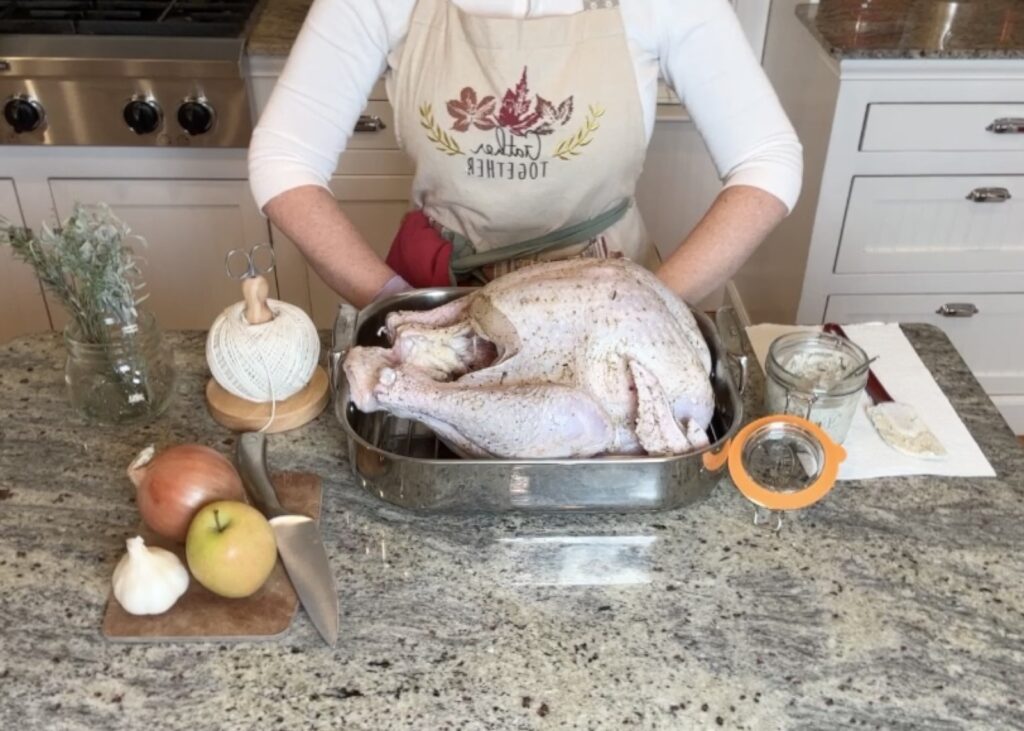
- First, remove the turkey from its packaging. Then, remove the giblets (heart, liver, and gizzard) and neck. Discard, or use the neck to make stock for the gravy. (I use the neck for stock and the other bits to make fresh batched dog food for my dogs.) If there is ice inside the turkey, pull it all out and discard the ice.
- Next, place the turkey in the roasting pan. (A roasting pan that has a metal rack inside the roasting pan.)
- Then, pat the turkey dry with paper towels.

- Sprinkle the dry brine evenly over the entire bird, including under the skin of the breasts if you can, and also inside the cavities. Use 1 tablespoon of dry brine per 5 pounds of turkey. (I use well-rounded tablespoons to account for dry brine fallout when sprinkling all over the turkey.)
This gives you perfect seasoning without making it too salty.


- Finally, refrigerate the dry-brined turkey for:
- 12–24 hours for smaller birds
- 24–48 hours for an extra flavorful turkey
- Do not rinse.
- Before roasting, you will be rubbing compound butter on the turkey (under and over the skin). Inside the cavity, adding herbs, citrus slices, or an apple, and aromatics (onion and garlic). Then sprinkling another 1tsp of the dry brine seasoning mix on top of the turkey all over evenly (in case some of the seasonings got rubbed off when applying the compound butter and to ensure even seasoning).
- 10–12 lb turkey use 2 to 2.5 tablespoons Homemade Citrus Herb Dry Brine for Turkey
- 12–14 lb turkey use 2.5 to 3 tablespoons Homemade Citrus Herb Dry Brine for Turkey
- 14–16 lb turkey use 3 to 3.5 tablespoons Homemade Citrus Herb Dry Brine for Turkey
Step 3: Make the Poultry Seasoning Compound Butter
- You can make the “Savory Seasoning Compound Butter” ahead of time or right before roasting, whatever works best for your timeline!
- This “Savory Poultry Seasoning Compound Butter” uses: Softened salted butter, salt, pepper, and “Homemade Poultry Seasoning” seasoning (sage, thyme, oregano/marjoram, rosemary, nutmeg, and black pepper).
- See my recipe for: “Homemade Poultry Seasoning” or use one of your choice.
Step 4: Gather the Aromatics to Stuff the Turkey’s Cavity
- The aromatics keep the bird moist and add incredible flavor.
- I like to stuff the cavity with:
- Onion
- Garlic
- Apples or oranges
- Fresh rosemary
- Fresh sage
- Fresh thyme
- NO Bread Stuffing! (Stuffing inside the bird slows cooking, prevents crisp skin, and can not reach a high enough temperature for food safety guidelines. Make dressing on the side instead.)
Step 5: THIS IS THE DAY OF COOKING! Apply the “Savory Poultry Seasoning Compound Butter” and Stuff the Turkey with Aromatics, then roast the turkey.
- First, take the turkey out of the refrigerator. Let the turkey sit on the counter for 30 to 45 minutes to un-chill before applying the “Savory Poultry Seasoning Compound Butter” and putting the turkey in the oven.
preheat the oven
- Then, preheat the oven to 450°F (or 425°F in convection).
- Apply the “Savory Poultry Seasoning Compound Butter” on the Turkey before roasting:
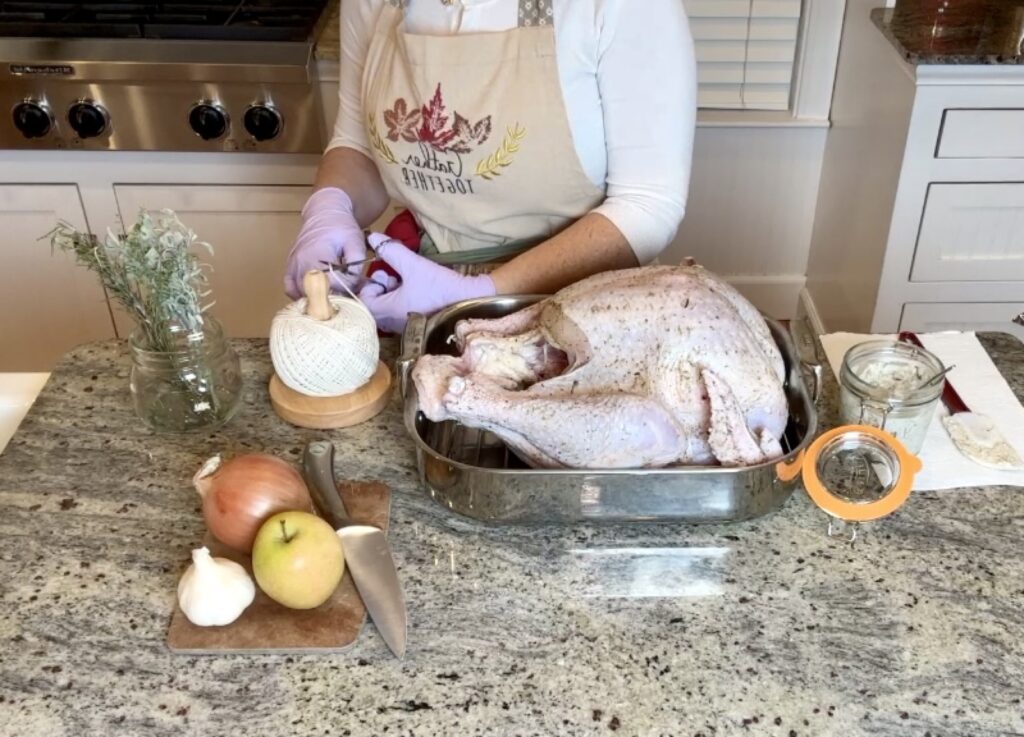
- While your hands are still clean, before they are contaminated, cut a piece of butcher’s twine (8″ to 12″). Spread the compound butter under the skin on top of the skin, and inside the cavity. Placing focus on the breast and thigh areas. The Savory Poultry Seasoning Compound Butter must be very soft (almost melted). This ensures proper spreading of the compound butter. The turkey is very cold. When the butter comes in contact with the turkey, it will be hard to spread unless it is very warm and spreadable. Work fast, as the longer the compound butter is in contact with the turkey, it will become more difficult to spread. The cold turkey will cool/harden the compound butter.


- Then add herbs, citrus slices, or an apple, and aromatics (onion and garlic) inside of the cavity.

- Next, sprinkle another 1 teaspoon of the dry brine seasoning mix on top of the turkey all over evenly (in case some of the seasonings got rubbed off when applying the compound butter and to ensure even seasoning).
- Finally, tie the turkey legs by crossing the twine over the top of the legs (making an “X”). Then, pull the twine tight to bring the legs together and tie a double knot to secure them. Then trim any excess string.

add liquid to the bottom of the roasting pan
- Then, add water or chicken/turkey stock to the bottom of the roasting pan. The amount of water/stock you add will depend on the size of the roasting pan that you are using. As well as what kind of rack you’re using inside your roasting pan. I recommend filling the bottom of the roasting pan with 1 inch of liquid.
- Next, add the thermometers into the turkey. I like to add two thermometers, one in the thickest part of the inner thigh (avoid touching the bone) and the other in the thickest center of the breast.
- Then, cover the turkey with foil. Use a large enough piece of foil to tent the foil over the top of the turkey, making sure not to have the foil resting on the top of the turkey. (The foil is not touching the top of the turkey. There is space between the top of the turkey and the foil.) Next, fix the foil to the edges of the roasting pan, crimping it down and making a very tight seal with the foil and the roasting pan.
- Put the foil-covered roasting pan in the pre-heated oven.

Step 6: Roast the Turkey (High Heat Covered → Low & Slow Uncovered)
- Roast the turkey 45 minutes covered to rapidly get the temperature of the turkey up and lock in the juices.
Step 7: Rotate the Turkey in the Oven after 45 Minutes of High Heat
- After 45 minutes, uncover the turkey: take the foil off the turkey, spin the pan around in the oven 180 degrees, and reduce the heat of the oven. If you don’t spin the turkey, you will likely have an unevenly cooked bird. Spinning the turkey around ensures even browning, no pale side, and no undercooked or overcooked half of a turkey. It is awkward with a big bird, but totally worth it!
- Continue roasting until done. (If the turkey starts to get too dark towards the end, you can loosely cover the turkey with foil again to protect the skin from over-browning.)
- Estimate:
- 13 minutes per pound (unstuffed)
- 15 minutes per pound (stuffed with aromatics only)
- Turkey is done at 160°F in the breast and 175°F in the thigh.
Carryover heat will raise it the to final few degrees.
- Estimate:

Step 8: Rest, Carve & Serve
Resting time:
Let your turkey rest at least 30 minutes (45–60 is even better).
This keeps all the juices in the meat instead of leaking onto the cutting board.
How to carve the turkey:
- First, remove legs and thighs.
- Then, remove wings.
- Next, slice breast meat off in two big slabs.
- Then, cut the breast meat crosswise into even slices in the desired thickness.
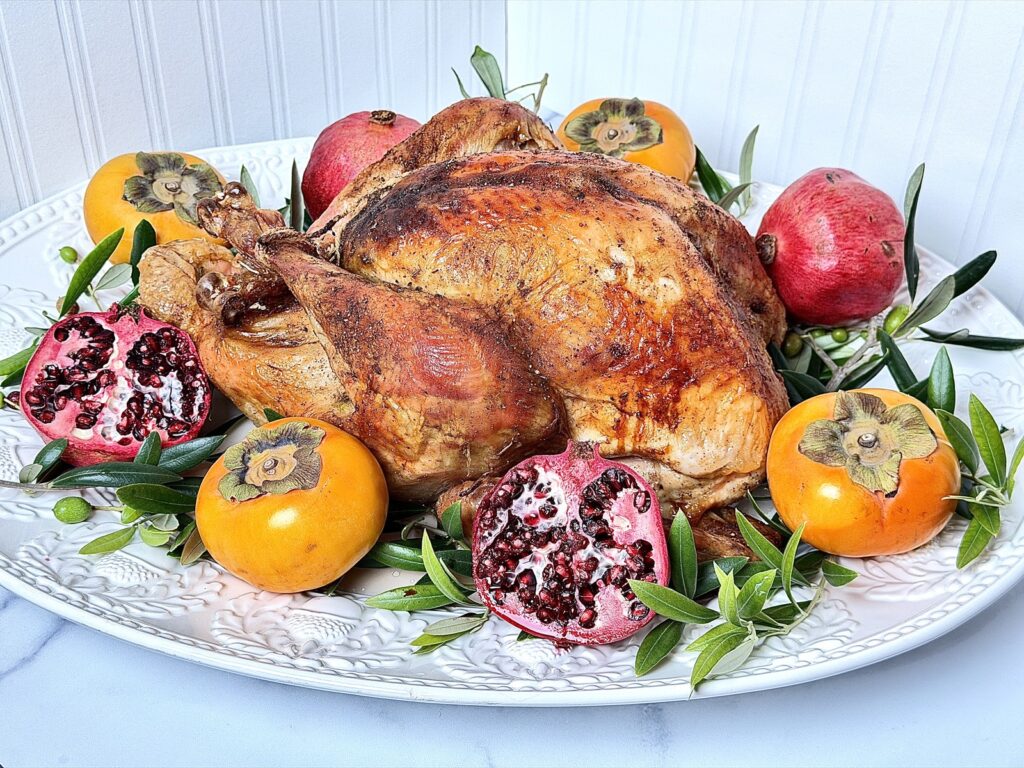
- Finally, arrange everything neatly on a platter with fresh herbs and citrus.
Final Notes & Pro Tips
- Dry brining makes the turkey self-basting, with no need to baste the turkey.
- Butter under the skin gives golden color and deep flavor.
- High heat at the beginning results in crisp skin without drying out the meat.
- A roasting rack allows heat to circulate for even cooking, and it doesn’t stew in the drippings.
- Spinning the turkey ensures even cooking.
- Resting is essential for juicy meat.
- This method produces a tender, flavorful turkey!

How to Bake the Perfect Turkey (Dry Brined with Compound Butter)
Equipment
- Roasting Pan
- Meat Thermometer
- Carving Knife Set
- Butchers Twine
Ingredients
- 1 Turkey
- 1 tbsp Homemade Homemade Citrus Herb Dry Brine for Turkey plus 1 teaspoon used after compound butter rub
- SSavory Seasoning Compound Butter 1 stick of butter, 1 tablespoon poultry seasoning, 1 teaspoon salt, ½ teaspoon of ground pepper
- Aromatics: onion garlic, herbs (thyme and sage), apple or orange
- water or stock to add to the bottom of the roasting pan
Instructions
Step 1: Plan Your Turkey Timeline (4-5 Days Total)
- Day 1–3: Turkey sits in the fridge, still wrapped, thawing slowly.
- Day 3 or 4: Unwrap the turkey, remove the turkey neck and giblets, and begin dry brining.
- Day 4 or 5: Rub the turkey with Savory Poultry Seasoning Compound Butter, and roast the turkey.
Step 2: Dry Brine the Turkey (24–48 Hours) THIS IS DAY 3 or 4!
- You can dry brine for as little as 12 hours, but 24 to 48 hours gives the best results.
- Use my recipe for Homemade Citrus Herb Dry Brine for Turkey or another dry brine you like.
- How to Brine the Turkey:First, remove the turkey from its packaging. Then, remove the giblets (heart, liver, and gizzard) and neck. Discard, or use the neck to make stock for the gravy. (I use the neck for stock and the other bits to make fresh batched dog food for my dogs.) If there is ice inside the turkey, pull it all out and discard the ice.
- Next, place the turkey in the roasting pan. (A roasting pan that has a metal rack inside the roasting pan.)
- Then, pat the turkey dry with paper towels.
- Sprinkle the dry brine evenly over the entire bird, including under the skin of the breasts if you can, and also inside the cavities. Use 1 tablespoon of dry brine per 5 pounds of turkey. (I use well-rounded tablespoons to account for dry brine fallout when sprinkling all over the turkey.)
- This gives you perfect seasoning without making it too salty.10–12 lb turkey use 2 to 2.5 tablespoons Homemade Citrus Herb Dry Brine for Turkey12–14 lb turkey use 2.5 to 3 tablespoons Homemade Citrus Herb Dry Brine for Turkey14–16 lb turkey use 3 to 3.5 tablespoons Homemade Citrus Herb Dry Brine for Turkey
- Finally, refrigerate the dry-brined turkey for:12–24 hours for smaller birds24–48 hours for an extra flavorful turkey
- Do not rinse.
Step 3: Make the Poultry Seasoning Compound Butter
- You can make the "Savory Poultry Seasoning Compound Butter" ahead of time or right before roasting, whatever works best for your timeline!
- See my recipe for: "Homemade Poultry Seasoning" or use one of your choice.
Step 4: Gather the Aromatics to Stuff the Turkey's Cavity
- I like to stuff the cavity with: onions, garlic, herbs (thyme, rosemary, sage), apples or oranges
- NO Bread Stuffing! (Stuffing inside the bird slows cooking, prevents crisp skin, and can not reach a high enough temperature for food safety guidelines. Make dressing on the side instead.)
Step 5: THIS IS THE DAY OF COOKING! Apply the "Savory Poultry Seasoning Compound Butter" and Stuff the Turkey with Aromatics, then roast the turkey.
- First, take the turkey out of the refrigerator. Let the turkey sit on the counter for 30 to 45 minutes to un-chill before applying the “Savory Poultry Seasoning Compound Butter” and putting the turkey in the oven.
- Then, preheat the oven to 450°F (or 425°F in convection).
- Apply the "Savory Poultry Seasoning Compound Butter" on the Turkey before roasting:While your hands are still clean, before they are contaminated, cut a piece of butcher's twine (8" to 12"). Spread the compound butter under the skin on top of the skin, and inside the cavity. Placing focus on the breast and thigh areas. The Savory Poultry Seasoning Compound Butter must be very soft (not melted but warm). This ensures proper spreading of the compound butter. The turkey is very cold. When the butter comes in contact with the turkey, it will be hard to spread unless it is very warm and spreadable. Work fast, as the longer the compound butter is in contact with the turkey, it will become more difficult to spread. The cold turkey will cool/harden the compound butter.
- Then add herbs, citrus slices, or an apple, and aromatics (onion and garlic) inside of the cavity.
- Next, sprinkle another 1 teaspoon of the dry brine seasoning mix on top of the turkey all over evenly (in case some of the seasonings got rubbed off when applying the compound butter and to ensure even seasoning).
- Finally, tie the turkey legs by crossing the twine over the top of the legs (making an "X”). Then, pull the twine tight to bring the legs together and tie a double knot to secure them. Then trim any excess string.
- Add liquid to the bottom of the roasting pan.
- Then, add water or chicken/turkey stock to the bottom of the roasting pan. The amount of water/stock you add will depend on the size of the roasting pan that you are using. As well as what kind of rack you’re using inside your roasting pan. I recommend filling the bottom of the roasting pan with 1 inch of liquid.
- Next, add the thermometers into the turkey. I like to add two thermometers, one in the thickest part of the inner thigh (avoid touching the bone) and the other in the thickest center of the breast.
- Then, cover the turkey with foil. Use a large enough piece of foil to tent the foil over the top of the turkey, making sure not to have the foil resting on the top of the turkey. (The foil is not touching the top of the turkey. There is space between the top of the turkey and the foil.) Next, fix the foil to the edges of the roasting pan, crimping it down and making a very tight seal with the foil and the roasting pan.
- Put the foil-covered roasting pan in the pre-heated oven.
Step 6: Roast the Turkey (High Heat Covered → Low & Slow Uncovered)
- Roast the turkey 45 minutes covered to rapidly get the temperature of the turkey up and lock in the juices.
Step 7: Rotate the Turkey in the Oven after 45 Minutes of High Heat
- After 45 minutes, uncover the turkey: take the foil off the turkey, spin the pan around in the oven 180 degrees, and reduce the heat of the oven. If you don’t spin the turkey, you will likely have an unevenly cooked bird. Spinning the turkey around ensures even browning, no pale side, and no undercooked or overcooked half of a turkey. It is awkward with a big bird, but totally worth it!
- Continue roasting until done. (If the turkey starts to get too dark towards the end, you can loosely cover the turkey with foil again to protect the skin from over-browning.)Estimate: 13 minutes per pound (unstuffed)15 minutes per pound (stuffed with aromatics only)Turkey is done at 160°F in the breast and 175°F in the thigh.Carryover heat will raise it to the final few degrees.
Step 8: Rest, Carve & Serve
- Resting time:
- Let your turkey rest at least 30 minutes (45–60 is even better).
- This keeps all the juices in the meat instead of leaking onto the cutting board.
How to carve the turkey:
- First, remove legs and thighs.
- Then, remove wings.
- Next, slice breast meat off in two big slabs.
- Then, cut the breast meat crosswise into even slices in the desired thickness.
- Finally, arrange everything neatly on a platter with fresh herbs and citrus.
Notes
- Dry brining makes the turkey self-basting, with no need to baste the turkey.
- Butter under the skin gives golden color and deep flavor.
- High heat at the beginning results in crisp skin without drying out the meat.
- A roasting rack allows heat to circulate for even cooking, and it doesn’t stew in the drippings.
- Spinning the turkey ensures even cooking.
Items I used: Roasting Pan, Meat Thermometer, Carving Knife Set, Butchers twine, Pyrex measuring cup, Kilner Round Swing Top Glass Jar, Diamond Kosher Salt, Spatula, Kilner Square Swing Top Glass Spice Jar, Kitchen White Flour Sack Towels
A Life Full of Living participates in affiliate advertising with Amazon and can receive a commission when you make a purchase through these Amazon links. Purchases made on Amazon through these links support content development on this site. Thank you!
Also, try my recipes for Perfect Mashed Potatoes Every Time, Easy Buttered Egg Noodles, Perfect Dinner Rolls, Festive Einkorn Sourdough Pumpkin Dinner Rolls, Perfect Green Beans with Bacon, Homemade Poultry Seasoning (Better Than Store-Bought!, Savory Poultry Seasoning Compound Butter, and Homemade Citrus Herb Dry Brine for Turkey (Also Great for Chicken and Steak!)


Interesting recipe post on roasting turkey and the dry-brine method—totally spot-on for consistency and flavor. As a professional in the beauty business, I appreciate how the step-by-step structure makes results predictable, not just vibes. In Suplery we champion tools that streamline operations, and a good platform can do the same for salons: inventory syncing, real-time stock updates, and a shared cart for team orders. If you’re looking to elevate how you manage product data and orders, Suplery offers features like a single dashboard for suppliers and automatic order prediction, helping you stay stocked for peak seasons. Consider a trial to see how this kind of system fuels efficiency for barbershops or salons.
This dry brine and compound butter method sounds like a game changer for turkey moisture and flavor. I’m excited to try it for my next holiday meal!
That citrus herb dry brine sounds fantastic—I might have to try that this year. I was reading about similar techniques on https://seed3d.ai and it helped me understand the science behind dry brining a bit better.